Quest 4: A fool and his bitcoin are soon parted
Table of contents
- OBJECTIVE: Saving the day(Progress Images)
- OBJECTIVE: Sweep funds to safety(Progress Images)
- OBJECTIVE: Defend against the bare key-backup problem(Progress Images)
- OBJECTIVE: Save funds once again(Progress Images)
- OBJECTIVE: Destroy your wallet on the unsafe computer and wipe the operating system to start fresh(Progress Images)
- OBJECTIVE: Reinstall Sparrow wallet
- OBJECTIVE: Defend against the dark arts of phishing and malware
- OBJECTIVE: Start using a hardware wallet
- OBJECTIVE: Download, verify and burn the SeedSigner image on a microSD card(Progress Images)
- OBJECTIVE: Verify your hardware wallet(Progress Images)
- OBJECTIVE: Verify spending with the hardware wallet(Progress Images)
- OBJECTIVE: Create a secure private key on SeedSigner (Progress Images)
- OBJECTIVE: Import the public key/Xpub from SeedSigner into Sparrow wallet(Progress Images)
- OBJECTIVE: “Buy” some more bitcoin from the signet faucet(Progress Images)
- OBJECTIVE: Upgrade Sparrow and SeedSigner
You spilled coffee on your paper backup! ☕
Literally, destroy the piece of paper you wrote your words on. Don’t fake this step. Now what? Is everything lost?
OBJECTIVE: Saving the day(Progress Images)
- Understand the implications of losing a backup: Those 12 words ARE your bitcoin! Is there a way to save the coins, or is it forever stuck in an unspendable state on the blockchain?
- Wait, you just generated the words on Sparrow… So, maybe it is saved on the machine as well in binary form?
- In Sparrow go to
Settings–>View Seed - Look, there it is!
- Now create 2 backups instead of one and put them to different places
- Paper lamination adds some protection to paper
- From now on, operate under the assumption that you are NOT protected by computers if all of your physical backups are destroyed!
- Human memory (aka brain wallet) and electronic devices are not to be trusted as safe and secure storages of highly sensitive information!
- Optional: Check advice for ordering Bitcoin-related things online
- Order metal plates to defend against all kinds of degradation
- Don’t use the steel plates yet! Use it later for real bitcoin.
Your backup is lost! 😱🖐️
You were sure you hid it under your mattress! How could that happen?! You can’t be sure if your backup was stolen, trashed, or just lost somehow. You don’t have time to ruminate and search for days.
OBJECTIVE: Sweep funds to safety(Progress Images)
- Create a new wallet
- Back it up, test recovery
- Transfer all funds to that ASAP!
- Generate a receive address in the new wallet
- Go to the
Sendtab in your first wallet - Select
Maxto send all funds - Set fee priority to
very high Create TransactionFinalize Transaction for SigningSignBroadcast Transaction
- Go to your new wallet’s
Transactionstab and see how the rescue transaction appears first unconfirmed(node learns about your transaction of interest) and then confirmations start to accumulate - Once your funds are safe, meaning the transaction has at least 6 confirmations(It could take an hour), delete the older wallet from Sparrow
- Also destroy the 2 backups associated with that old wallet because your transaction history is still tied to it
Warning: A cunning attacker would have just taken a photo or written down the information on the backup and you might never know that it is compromised.
There is a way to defend against people finding your key backups. You can create a so-called “passphrased wallet” which requires your passphrase in addition to your seed words to access the funds.
OBJECTIVE: Defend against the bare key-backup problem(Progress Images)
- 💡Learn about passphrased wallets
- Create a new wallet but this time, use the bip39 passphrase feature in Sparrow
- No password needed yet
- Create the 2 seed phrase backups and 2 additional passphrase backups
- Write down the wallet name and the master fingerprint in the paper notebook
- Transfer funds to the more secure passphrased wallet!
- Delete old wallet from Sparrow and destroy old wallet backups
- The seed words and the passphrase backups have to be stored separately to avoid single points of failure
- All your key backups or all of your passphrase backups are lost/destroyed if you keep it in a single location
- A malicious attacker finds a copy of your private key backup and a copy of your passphrase in a single location
- Choose the locations wisely
- Safes and vaults are great but secret places where no one would look suffices for the time being
- The further away you put a passphrase from a key the safer but the harder it is to access funds
- Think about the consequences of selecting locations but for this task you can just take a mental note where you _would _put them were they to store real funds. Then put them somewhere separate in your room.
- Write down the locations in a paper notebook
Now you have a fairly robust setup that protects against accidental loss and funds are not too easy access for a snooper. Note however that the more copies you make the higher chance there is for a piece of confidential information to be compromised!
You fell for a clickbait email. You downloaded some strange file and now your computer seems to be infected. 📥🦠
The computer now is compromised meaning cyber attackers can steal your keys from your computer and log your keystrokes whenever you input your passphrase!
OBJECTIVE: Save funds once again(Progress Images)
- You don’t have time to fix the infected machine yet
- Get another safe desktop computer or a safe mobile phone
- Get a copy of the secret key and the passphrase backups
- Install Sparrow on the desktop (or Samourai wallet on mobile if you were on
mainnet, stay on desktop for this exercise though) and recover your wallet - In Sparrow/Samourai create a new passphrased wallet(new seed phrase, new passphrase) on the other, safe device
- This time, also make sure to set an encryption password
- Don’t mistake passphrases for wallet-encryption passwords
- Write down the wallet password in your notebook
- Samourai will always by default ask for a passphrase when you create a wallet and use it as an encryption password as well for automatic backups
- Sweep your funds to the newly created wallet
Now your funds are safe but as long as the wallet file is on the infected machine, at least your bitcoin transaction history can still be stolen by the attacker(if there wasn’t any other sensitive data on the computer).
OBJECTIVE: Destroy your wallet on the unsafe computer and wipe the operating system to start fresh(Progress Images)
- You could just delete wallets from sparrow as an easy but not very secure deletion method
- The better way is to find the location where sparrow stores your wallet data and erase it with the
shredcommand- In the directory where the wallet is stored run this command in the terminal. Sparrow uses a hidden directory to store wallets
cd ~/.sparrow/signet/walletssudo shred -zvu -n 5 <your_wallet_file_name> - Warning! This command is to be handled with special caution!
- In the directory where the wallet is stored run this command in the terminal. Sparrow uses a hidden directory to store wallets
- The ultimate safest way is to incinerate the storage device which is how Google and all serious companies deals with secure deletion of sensitive data
- Optionally reinstall Ubuntu on the unsafe computer. Select
erase diskand in the advanced section it gives you the option tooverwrite all data. It will be slower than a normal reinstall- Make sure nothing important is permanently deleted just because of this exercise
There is a case to be made for never using a compromised computer ever again to store real funds. There are types of malware that can be baked in even above the operating system level. Decide at your own risk.
Your wallet is protected with military-grade encryption if you use an encryption password. This means that if any attacker could access your wallet file they would have to crack that encryption to gain any info on your bitcoin.
If you did not reinstall Ubuntu, now just simulate starting fresh by reinstalling Sparrow wallet. If you went for the reinstall and you already set up Sparrow you will now reinstall anyway for practicing purposes.
OBJECTIVE: Reinstall Sparrow wallet
- Close Sparrow
- Do it from the terminal
sudo apt remove sparrow - Now delete all the downloaded files (for real!)
cd ~/Downloadsrm *sparrow* - The
'*'character is for pattern matching. See “linux shell regular expressions” for more info - Download files again from the Sparrow wallet website
- There is something really strange with this website, don’t you think?
You visited a copycat website to download Sparrow wallet. You almost fell for another trickster! 📥🦠 (Don’t worry this is just for simulation purposes. Or is it? ;)
OBJECTIVE: Defend against the dark arts of phishing and malware
- 💡 Understand phishing attacks
- ALWAYS inspect links before visiting a new website, especially when it is bitcoin-related
- Always verify the https lock 🔒 icon while browsing
- Get used to possible other sanity checks:
- Scammy language usage
- Rough, unpolished GUI
- Strange popups
- Asking for confidential data e.g. seed words, passphrases, passwords unrelated to that service
- Verify and reinstall Sparrow
You now see the problem with storing secrets on general purpose computers connected to the internet. Can we solve this problem somehow?
OBJECTIVE: Start using a hardware wallet
- 💡 Learn about hardware wallets and cold storage
- Order a hardware wallet. Good choices:
- You can order prebuilt versions of SeedSigner as well as Specter! See recommended shops in “Advice for ordering bitcoin related things” section
-
SeedSigner(tutorials will rely on this device!)
- The “open pill” design with the standard raspberry camera (instead of zero cam) was the best experience for me
- SpecterDIY
- Coldcard
- Foundation Passport
- 💡 Check advice for ordering bitcoin related things
- Order a USB web camera with a privacy shutter. This is to read QR codes into Sparrow. Kind of a struggle with Laptop built-in webcams but it works
- Order endurance/industrial-type microSD cards, no need for huge capacity, smallest is enough, Kingston preferred. Order a few spare pieces for later assignments
- Order a multifunctional sd/microsd card reader for your desktop. Kingston is decent.
- Look at how the hardware wallet is powered (no USB cables remember) and order batteries if needed. SeedSigner has its own power supply
- Don’t be cheap. Buy reputable brands to save you from headaches
You may find yourself spending a few hundred cuckbucks on bitcoin related stuff if you want a decent setup. Your bitcoin security budget when compared to securing e.g. physical gold is not that pricey though.
Your hardware wallet has arrived. Time to go Cold Storage 🧊
So how can you be pretty sure this thing will not steal your bitcoin? There can be many methods devised to verify hardware wallets. The verification also depends on your type of hww and available resources.
OBJECTIVE: Download, verify and burn the SeedSigner image on a microSD card(Progress Images)
- Alternative guide on SeedSigner github page
- Boot into Ubuntu Live(safe clean environment for critical tasks)
- Get your Ubuntu installation USB stick
- Insert it into your computer and reboot
- You might have to change the boot order in the BIOS settings to boot from the USB stick
- Select
Try or install Ubuntu - Wait to boot, it’s gonna take longer
- Select
Try Ubuntu. This takes you to a clean environment. It is safer for verification. It forgets any changes you make in the system once your reboot unless you deliberately save files on persistent storage outside this environment
- In Firefox (default in Ubuntu Live) go to the SeedSigner website
- Right on the front page it gives you what you need
- Go to the GPG pubkey link it will take you to a Github file
- Go to the “raw” file. Copy the URL in the browser
- Go to terminal. Install curl package. The clean environment does not have anything installed that you already have on your normal system
sudo apt install curl - Import the pubkey into gpg
curl <paste URL> | gpg --import - Go back to SeedSigner home page and select “Download The Latest Release”
- Read the description carefully
- Download the
<release_version>sha256file - Download the
<release_version>sha256.sigfile - Download the
<release_version>.<your_pi_version>.imgfile
- Go to the Downloads folder
cd ~/Downloads - Verify the
sha256manifest filegpg –verify <release_version>.sha256.sig- Hopefully it says …Good signature…
- Verify that your image file’s hash fingerprint indeed matches one of the precomputed hashes in the
sha256filesha256sum -c <release_version>.sha256 --ignore-missing- Should output “…OK”
- You can check what these manifest files look like with nano
- You can fairly trust the image at this point. You might go to the SeedSigner Telegram group or nostr, Twitter, Github, Keybase to get additional verification, most of all the gpg pubkey to match with the one you downloaded
- The Telegram group should have above 1000 members and a good amount of history. Browse a little bit in the chat to verify you are in the right place. Many scam groups out there
- You save the verified image file on a persistent storage device like your hdd or an sd card for later use
- Burn the image you previously saved with Balena Etcher on a dedicated microSD card
- Download Balena etcher for Linux x64 bit AppImage file
cd ~/Downloadschmod +x balenaEtcher<release_version>.AppImage - It will require a package named fuse. We get it by adding the “universe” package repository to our clean system and then install the package from there
sudo add-apt-repository universesudo apt install fuse - Run Balena Etcher and burn the SeedSigner OS image on the dedicated microSD card
- Download Balena etcher for Linux x64 bit AppImage file
- Never use that sd card for anything else and never insert it into any computer apart from your SeedSigner!
- Never leave SeedSigner powered on! Always cut it from power after sessions! Serious risk!
-
Never let others tamper with it and don’t leave it where others might touch it. Your funds are at risk!
- An evil maid or an advanced attacker could swap your sd card for another tainted one
- You can mark the microSD with a permanent marker
- Insert the sd into your raspberry pi and test if it boots SeedSigner OS alright
- Should take 1 minute at most
- If all is good, you can
rebootyour computer. Remove the USB stick when it prompts you, not sooner! - Boot your computer into your regular environment
This “live operating system” method can be used to verify crucial things or carry out critical operations when you want to make sure you don’t leak info on a clean system. All your package installs and downloads are gone now.
OBJECTIVE: Verify your hardware wallet(Progress Images)
- If you get a device from one of the reputed vendors then it will arrive in a tamper-evident bag. Check it carefully and follow vendor instructions!
- Create a new
dummy walletin Sparrow with no funds and no history- 12 words
- No need for passphrase
- Go along with the defaults otherwise
- No need for password either
- Go to the
Addressestab and see the first few addresses - Power up your hardware wallet
- Switch it to testnet mode
- SeedSigner:
Settings–>Advanced–>Bitcoin network–>Testnet - You might set it up to remember the configuration settings only:
Settings–>Persistent settings–>Enabled - This does not remember your private key, just the configurations like testnet mode
- SeedSigner:
- Recover the dummy seed phrase
-
Seeds–>Enter 12-word seed - With the joystick you can select the characters
- SeedSigner will try to guess the word from the characters already given
- The buttons on the right side help select the word you want. The one in the middle selects the word
- You can delete characters or go back to edit a word
- No passphrase, just click
Done
-
- Navigate to the address explorer in the hardware wallet
- Seedsigner:
Address Explorer–>Native Segwit–>Receive Addresses(or change address, only the matching matters)
- Seedsigner:
- Cross-check the addresses you see in Sparrow with the addresses in your hardware wallet
- If you have hardware wallets of multiple hardware profiles you can add that to the checking process too
OBJECTIVE: Verify spending with the hardware wallet(Progress Images)
- Send a small amount of testcoins to this dummy wallet from your main wallet
- 15.000 sats is enough
- Now send it back using Sparrow AND Seedsigner to sign the transaction
- Create the transaction in Sparrow
- Select
Finalize Transaction for Signing - Select
Show QR: This will show a QR code containing the unsigned bitcoin transaction - Scan it with the HWW camera
- SeedSigner:
Scanoption in main menu - If you struggle with the scan:
- Try to clean the camera lens with a cloth
-
Decrease densityof the QR in Sparrow - Try to do it in better lighting conditions
- If you struggle with the focus too much try to adjust it
- SeedSigner:
- Review the transaction details on SeedSigner
- Check addresses in Sparrow if they match
-
Approve PSBT(sign): This will show the QR code containing the signed transaction data on the SeedSigner screen - Scan it now with your USB web camera (or laptop webcam)
- Cancel the QR window in Sparrow
- Click
Scan QRand scan it with the webcam. It will be harder because SeedSigner has a small screen- If it shows an error try to enable the webcam if it is disabled or reconnect USB
- Orientation doesn’t matter
- Try to wait for autofocus to kick in
- Hold the camera(or the hardware wallet) firm. You can put your elbow on the desk to get more stability
- Try to establish good lighting conditions: Reduce glare by reducing brightness of the screen with the joystick down action and/or adjusting the surrounding lights
- Now you can see the
Signatureprogress bar in Sparrow filled blue - You can
View the Final Transaction Broadcast Transaction- If everything went well and the sum appears in your Passphrased Wallet after a while, the spend was successful
- You can safely unplug SeedSigner from power, it will not harm the device. The USB cable is less durable so unplug from AC socket rather
- Now you can trust your signing device even more
Now that you verified your hardware wallet sufficiently you can start migrating your stack to cold storage using the hardware wallet.
OBJECTIVE: Create a secure private key on SeedSigner (Progress Images)
- As soon as SeedSigner has booted you can remove the sd card to as an additional security measure before you load or create any private keys on it
-
Main menu->Tools-> SelectNew seedfrom camera or dice - Select 12 words
- Roll with the dice or capture the image and follow instructions
- Once you get to the
Finalize Seedscreen selectBIP39 Passphrase - Use your previous passphrase
- Back it up properly, verify
- Write down the master fingerprint as well
- Done
- You can backup the seed anytime until you power-off the device.
Seeds-> Select your seed ->Backup Seed
- You can backup the seed anytime until you power-off the device.
OBJECTIVE: Import the public key/Xpub from SeedSigner into Sparrow wallet(Progress Images)
- In Sparrow Go to
File–>New wallet–> Name it - Select
Airgapped Hardware Wallet - Find your brand and click
Scan - Now get your hardware wallet
- From the main menu go to
Seeds–> Click on Seed - Select
Export Xpub–>Single Sig–>Native Segwit–>Sparrow - It will prompt you that you are now giving Important Privacy Information to Sparrow. Click I understand
- It will show you the Xpub details screen. The fingerprint is what matters to you right now
- Click
Export Xpub. It will show the QR code - Scan it with the webcam into Sparrow
- You will see the progress in Sparrow as the animated QR code is loaded in full
- Hold it firm until the scan is complete
- You see the data appearing in Sparrow. Click
Apply - Add an encryption
Wallet Passwordof your choice- Sparrow will only store your
Xpubso it cannot leak your private key. At most the encrypted payment history file can leak from the unsafe computer - Don’t ever mistake your passphrase for the encryption password because you basically compromise it at that very moment!
- Sparrow will only store your
- Test total recovery of the airgapped wallet
- Delete wallet from Sparrow
- Unplug SeedSigner from the power source
- For stateful devices like Coldcard/Foundation:
Erase/Destroythe seed. The option will be around theAdvanced settings/Danger zonesections
- For stateful devices like Coldcard/Foundation:
- Recover your private key with the seed words backup on your hardware wallet
- Create the new airgapped wallet in Sparrow again
- Do the
Xpubtransfer process again
- Sweep your funds into the airgapped wallet
- You don’t need SeedSigner for that because we send from the hot wallet
- You can delete the old Passphrased hot wallet
- Test self-spend of the airgapped wallet
- Copy an unused receive address to the
Sendtab of the same wallet - Send 10.000 sats to the same wallets address
- Sign it with SeedSigner
- Also see that the
Change Addressgets verified too - See it confirming in Sparrow
- Copy an unused receive address to the
You start to get the idea about hardware wallets. Now we can test the address verification function. Best way to do this is stacking some more sats! :)
OBJECTIVE: “Buy” some more bitcoin from the signet faucet(Progress Images)
- Generate a new receiving address in your watch-only wallet
Receivetab in Sparrow- Check the icon about address reuse
- There is a QR code next to the address. Get the Hardware wallet and Scan the address
- Click on it in Sparrow wallet to enlarge
- Once it is scanned the device will recognize that it is a bitcoin address and will give you the option to verify it
- SeedSigner: Select the seed to verify or load another one (if it is an address of a different seed than the loaded one) for the verification
- Verify receiving address on the hardware wallet
- If the verification takes too long (multiple thousands of addresses are checked and no match is found) there is something weird going on. It should raise suspicion
- If you restarted SeedSigner and you are in mainnet mode instead of testnet, the address cannot be verified!
- Addresses on mainnet differ from testnet for obvious security reasons
- After verification you can now use the safe address and do the transfer from the faucet as usual
Don’t trust networked computers from now on. Never put any crucial sensitive data in them, like your cold storage secret keys or passphrases. Only trust your verified hardware wallet
Secure your hardware wallet so you minimize the threat of tampering(swapping out sd cards or whole device)
Even if your computer is not to be trusted, it is also important to note that other computers are less trustworthy which means don’t even run any Wallet software like Sparrow wallet on unknown or unsafe computers.
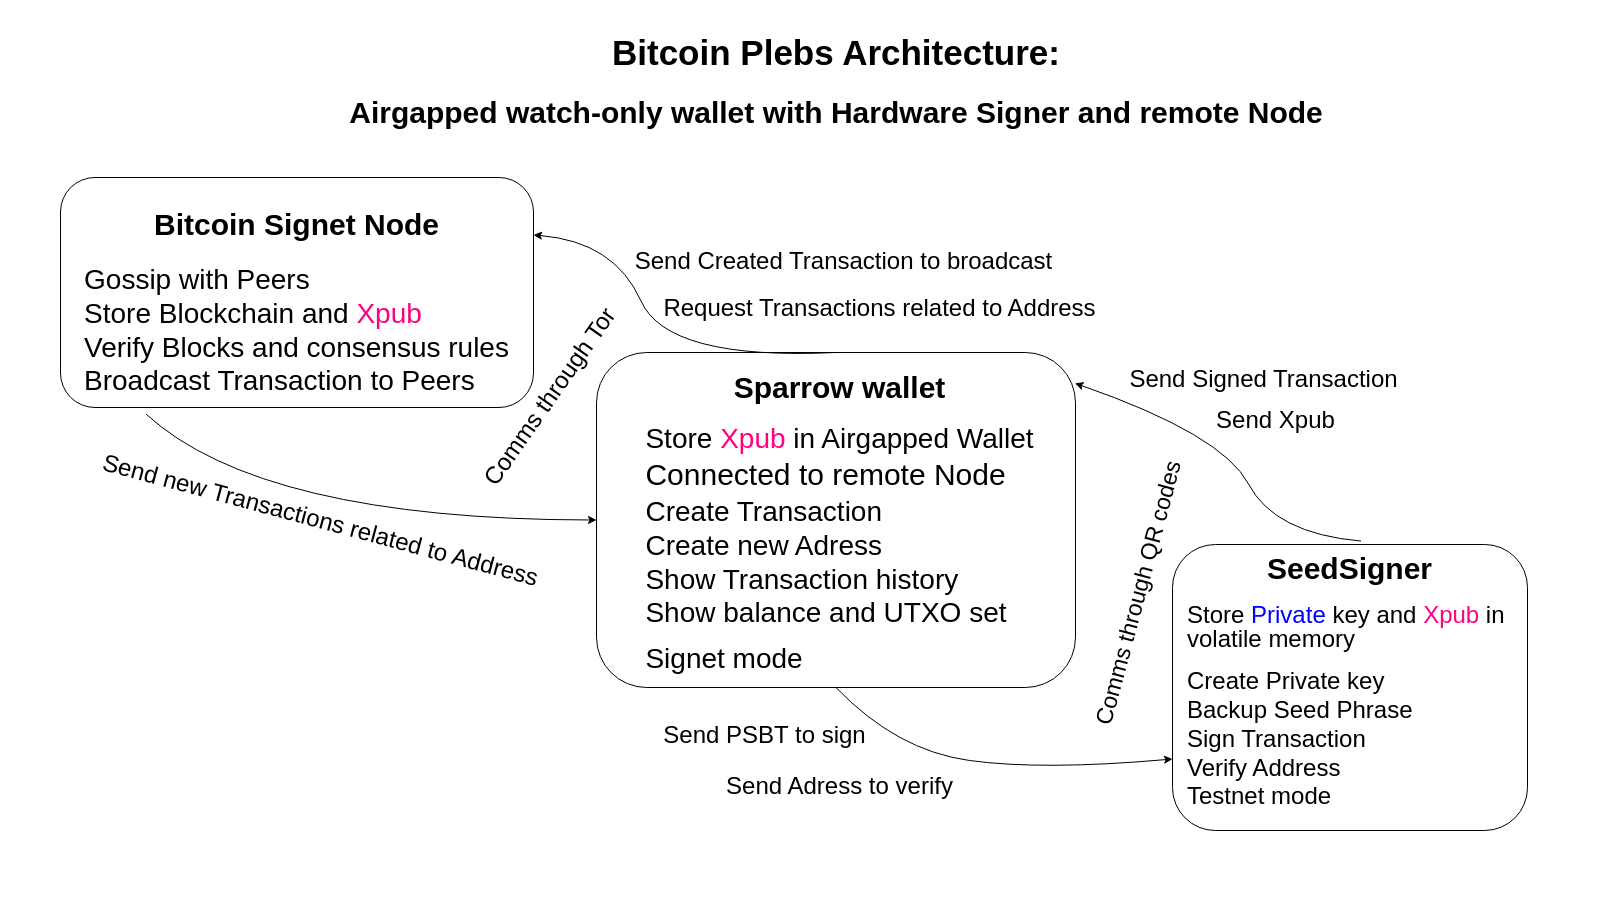
Your bitcoin tech-architecture looks like this(click to enlarge):
Sparrow and Seedsigner released new versions. Time to update software and firmware securely 💽
OBJECTIVE: Upgrade Sparrow and SeedSigner
- Exit Sparrow if it is running
- Delete old downloaded sparrow files
- Go to the right website of Sparrow wallet and download the latest version
- Verify Sparrow according to previous instructions
- The gpg key is already imported at this point
-
Upgrade Sparrow to the latest version the same way you installed it
sudo apt install ./<sparrow_release_version>.deb6. Upgrade SeedSigner
- You can destroy your previous microSD and dedicate a brand new one for an additional safety guarantee
- Boot your computer into Ubuntu live again and complete the steps described before
- You will not have the gpg key imported on the clean Ubuntu live system, so you do everything from scratch