Quest 6: The first line of defense: Bitcoin Privacy
Table of contents
- OBJECTIVE: Get to know the enemy(Progress Images)
- OBJECTIVE: Start practicing coin control(Progress Images)
- OBJECTIVE: 💡 Learn about bitcoin nodes
- Your Options in Self-Hosting Land
- Option 1: Go the OG way
- OBJECTIVE(optional): Prepare the external 1TB SSD(Progress Images)
- OBJECTIVE: Download bitcoin core and prepare for verification(Progress Images)
- OBJECTIVE: Verify Bitcoin Core(Progress Images)
- OBJECTIVE: Install Bitcoin Core(Progress Images)
- OBJECTIVE: Setup a Tor proxy service(Progress Images)
- OBJECTIVE: Configure and learn to manage Bitcoin Core(Progress Images)
- OBJECTIVE(optional): Upgrading bitcoin core in the future
Now it starts to get more serious. You will realize that security is not just about doing everything “the right way”. It is far more than that. Security is also about hiding ourselves from the foe and revealing ourselves to the friend.
In essence: Privacy
OBJECTIVE: Get to know the enemy(Progress Images)
- 💡Learn a lesson about Bitcoin Plebs and Privacy
- Use the Tor Browser to go to the chain analysis research site OXT
- This site has been developed by privacy advocates to raise awareness and help others use bitcoin privately. It is a free-to-use chain-analysis tool with a bunch of other useful information on the bitcoin base-layer
- Browse the site and play around with it
- The wallet clustering of different big fishes is interesting
- The history of bitcoin is a very interesting section too
- Create a transaction where you merge multiple UTXOs into one UTXO
- Select multiple UTXOs in your wallet on the
UTXOstab, with left mouse click while holdingctrlbutton - If you don’t have multiple UTXOs get some from Mutinynet faucet or perform a self-spend
- Choose the
Send selectedoption. It will take you to theSendtab to complete the transaction creation process - Send it to this address
tb1q8660fer4ch2twd6xn58e8pau3edkgkvft9a654 - Fill in a label e.g.
Merged inputs test
- Select multiple UTXOs in your wallet on the
- Check the privacy ramifications of your transaction in Sparrow
- Sparrow will show you the transaction graph. It shows that two of your UTXOs are the inputs merged into one output and some fee
- At the bottom of the page you can see an
“i”info icon with“Analysis”written on it. Hover over it to see the message - Sparrow will tell you how you could improve the privacy of the transaction, if it is possible in the first place. Limiting factors would sometimes need you to ask for a different address type or do other things you might not be willing to do just for more privacy. But it is nice to know nonetheless
- You can see that there are buttons next to the Analysis to select either fee efficiency or privacy when Sparrow constructs a transaction. This is not always available because sometimes Sparrow can’t optimize for privacy for external reasons(mainly address types and coin control reasons: you chose specific UTXOs to spend)
- Complete the transaction
- In Mutinynet signet block explorer search for the address you sent it to
- Click on the address I gave you and see its history
tb1q8660fer4ch2twd6xn58e8pau3edkgkvft9a654 - What you see is that everyone who completes this task sends a transaction to this fixed address. This is called address reuse. Now you can have an informed guess about some things if this was a mainnet address:
- A person collects money on a fixed address. This could be a donation fund or some kind of service with regular customers or allowance etc.: A sole address used as a wallet basically
- You still might find out interesting things about this signet address e.g.:
- How many people completed this task
- Looking at transaction dates and correlating this info with nostr notes further gives you info on the growth rate of the group and potentially also some info about group members
- Click on the address I gave you and see its history
- Now open up a Tor browser and go to this site:
- https://keepassxc.org/donate/
- Scroll down. It will probably show you the donation address KeePassXC uses. Such a great password manager could use a fixed address for donations? “You gotta be kidding me, right?” No.
1P7VPcL31rFzcHKbgVoqW6VoMBRQY5UYdR - Many projects only provide a fixed address because it is convenient. It is very bad privacy though
- Use BTCPay Server or bip47 paynyms for more privacy when the you want to give users automatic addresses for a service or donations
- Search that address in mempool.space switching to mainnet. You will see all the incoming bitcoin in the past, current balance and if you scroll down you can browse recent and past transaction activity. The address is highlighted in all transaction graphs.
- Now you could try to track down donors’ addresses or see how KeePassXC uses their donation fund and try to find out more about their developers/contributors addresses
- You could try to look into this in OXT as well. Since this is a chain analysis tool it will give you additional details e.g. time pattern analysis of the transactions to this address
- Chain analysis has to have a starting point. This is a bitcoin address that they know more external info about. It has to be a strong assumption about the true identity behind that address
- Then it can try to follow this UTXO through the transaction graph and make guesses about what exactly happened in each followup transaction. This, correlated with even more external info can reveal a whole lot about the identities of everyone involved with that address
Most of the time you can use the privacy option in Sparrow if the receive address type matches yours and you don’t force Sparrow to use your specific UTXOs as inputs. You just go to the “Send” tab and put in the desired amount of sats and the receive address.
This way Sparrow will apply its own coin selection algorithm to construct a transaction that suits your needs. Also by default, Sparrow will never reuse an address. Beware however that Sparrow needs to be connected to a bitcoin node to check addresses, which means if you want to generate an address for a payment and Sparrow is offline, you could accidentally get a used receive address.
In transaction creation mode Sparrow can even reconstruct a transaction in a different way if you edit the transaction graph excluding some UTXOs. This is of course only possible if you have many UTXOs to choose from in the first place.
You could ask right now: “Why on earth would I ever want to control which coins I want to spend specifically?” This only has downsides! Can’t Sparrow always take care of this privacy nuisance by itself?!
This is where your external information comes in. You know more about your transactions and UTXOs than Sparrow does. Sparrow knows only about the blockchain data. You know about real-life data. The power of Sparrow and you can be combined to create a shield of obfuscation and confuse your enemies trying to doxx you.
OBJECTIVE: Start practicing coin control(Progress Images)
- Make a few transactions and label them. Make it as if they belonged to both usual transactions and unusual ones:
- Use different wallets, address types, amounts… Devise interesting life-like scenarios. Imitate KYC bitcoin purchases too for the sake of having some doxxed UTXOs to practice with
- Use consistent labeling. E.g.: To: btcplebs; reason: donation (lol)
- When receiving: From: joe; reason: sale of old laptop
- You can override Sparrow’s coin selection by hovering on one of the inputs and clicking the little
“x”icon on the Transaction Graph in the Transaction creation window - You can make a doxxing change UTXO unspendable by going to UTXOs tab and right click on the “Outputs” column of that specific UTXO. The context menu gives the option to “freeze” the UTXO
- This way it became unspendable until you “unfreeze” it
- 💡 Read Sparrow docs on spending privately
- Many of these privacy practices will become usable when we get to mainnet
- Create followup transactions using UTXOs from your initial transactions as inputs. Use Sparrow privacy info icon and transaction visualization along with your labels:
- Transactions with good privacy practices
- Transactions with potentially doxxing bad privacy practices
- Analyze the privacy implications of these followup transactions based on heuristics you learned about. Be the evil chain analysis company. Use a blockchain explorer and add any other external data you would be using to doxx yourself
- Export your wallet history and labels by generating a Sparrow wallet export file(this feature is based on a BIP so other wallets will implement it in time to be compatible)
- Select the wallet to be exported on the wallets tab
-
File–>Export–> Select sparrow –> Save file - The export will use your wallet encryption password to store it safely
- Save the export in your Keepass Database(
Advanced–>Addin the Attachments section) - Delete the watch-only wallet from Sparrow
- Restore from the Keepass database(
Advanced–> Select attachment –>Save) and reload it in Sparrow - Find your precious labels recovered
- Share the experience with friends and on nostr!
So far Sparrow has been connecting to the Bitcoin Plebs dedicated learning Node running on testnet. This is great for learning and experimenting but it is time you switched to the real stuff and started to take your finances into your own hands.
OBJECTIVE: 💡 Learn about bitcoin nodes
While it is very bad practice to leak your financial data to third parties by using other’s nodes, you can still go back and use this test setup any time. It is not leaking real financial information.
So, the result architecture you want to arrive at looks like the following: 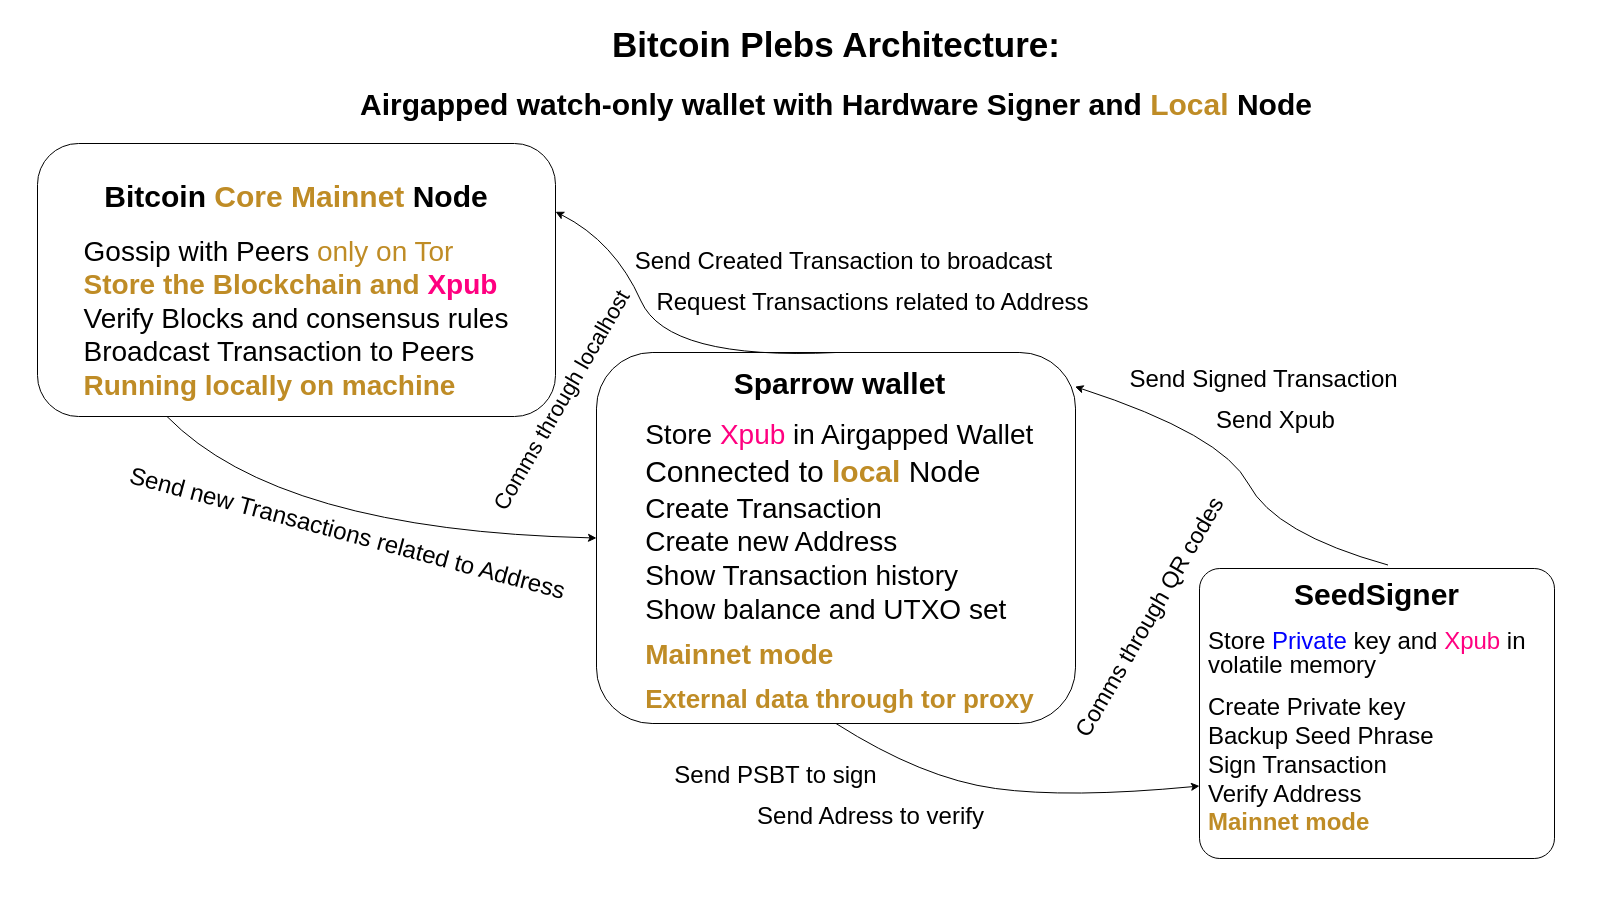
There are three major ways to interact with the bitcoin peer-to-peer network:
- Using others nodes: Not recommended. Sparrow has preconfigured “more trusted” public nodes in Sparrow mainnet mode in the “Public Servers” section. You don’t necessarily doxx your identity by default if you use public servers but if you want to be serious, don’t trust, verify
- Using your dedicated hosted node service and connecting remotely: A trade-off worth thinking about. Less pain with hosting BUT there is the risk of the service provider logging or leaking your activities and it can shut you down or try to deanonymize you. They will comply immediately if authorities turn up and you might not even know about it. Having said that, I think Nodl cloud is a great choice in this category
- Self hosting your own node: Accessible and the most sovereign way, with the added perk of learning opportunities. Especially if you plan to stack your savings in bitcoin and to onboard family and friends. You can be the “Uncle Jim” for them until they learn enough to do it themselves.
In bitcoin they also say “trusted third parties are security holes” to emphasize how much better off you are security-wise if you self-host your own verified bitcoin node. In fact you can self-host many other important pieces of open-source bitcoin-related software like your own mempool.space instance or BTCPay server. Feel free to jump into these rabbit holes to gain even more sovereignty and learn cool computer-skills.
Your Options in Self-Hosting Land
Full node options
Self-hosting your node at home is a good practice in bitcoin. First you have to choose which full node solution you want to go with. Setting up your own bitcoin core full node has the most learning benefits with the least technical burden in my opinion. Node packages on the other hand come with extra features and default settings which harden the node’s privacy and security. This comes at the cost of added complexity if you really want to know what’s going on under the hood and verify.
You can also setup your own bitcoin core node and then plan to upgrade it to a packaged node in the future. Or you can also go all in and set up everything by yourself from scratch which is a quite daunting task for most people.
Networking: Connection to your own node vs. Connection to peer nodes
You can configure your node on the machine where you run Sparrow which is the plain and simple solution but you can dedicate a machine solely to run a bitcoin node which is the most secure and efficient solution long-term. The dedicated hardware solution entails that you have to use ssh(secure shell) to troubleshoot and configure that dedicated machine.
Controlling and querying your node(e.g. with Sparrow) from your home network is easier but there are certain cases where you might want to connect from a remote location through the internet. There are different possible solutions to do this securely and privately. While you could do this through tor, it is going to be a subpar user experience. I recommend you to look into VPN solutions like tailscale and zerotier. This program will only show you the basics which is to run and connect to everything bitcoin-related on just one machine through. Later on you could separate the different parts and features to gain more flexibility and functionality as you are growing in skills and understanding.
As to how your node connects to other “peer” nodes though, tor is going to be the go-to solution today for average users. There are other anonimity networks supported by bitcoin core like the Invisible Internet project(I2P) which are less-used than Tor(number of users greatly influences privacy gains) but they could serve as backup solutions when Tor is attacked.
Option 1(Recommended): Go the OG way
The most recommended option is to set up bitcoin core manually. This is going to be a technical guide with terminal usage. Although highly recommended with great learning opportunities, you will have to demonstrate Proof of Work to complete it. By the time you get this section done, you will improve your command-line skills, get a good grasp on how Bitcoin full nodes work under the hood and most importantly you will know how to set up a bitcoin full node quickly from scratch with strong verification.
Trust me you don’t want to miss out on these perks of learning the hard way and getting your hands dirty! Even if you go for prepackaged nodes later to access advanced features more easily, being able to run your own verified bitcoin core is a huge plus. And it’s the cheapest solution too.
Option 2: Buy a node-in-a-box and connect to it from Desktop
This is a convenient option if you have the extra bucks (from ca. 400$ - 1000$). Consider this an investment in the security of your funds. If you plan to stack your savings in bitcoin, you will really need dedicated hardware at some point. All the following projects come packaged with extra services for your diverse needs.
Note that these node packages all build on bitcoin core as their central starting point. They just made the management of bitcoin core easier and built other nice features on it. This dedicated hardware approach can also be considered safer because of the same reason as hardware wallets. They also make it easier to use the node in a more secure and private way.
The list of my favorite open-source node projects were selected by these criteria:
- Most FOSS-like license: There is much nuance to digest in this area and people have their subjective takes on open-source licensing. However, I only stand by projects that whole-heartedly live and breathe the open-source ethos. “Source-viewable” and “source verifiable” is not fully open-source so I prefer FOSS licensed software
- Most ethical teams behind the project: Projects maintained by renowned open-source contributors
- Best for learning and growing: Using the software teaches you fundamental concepts of bitcoin. Lets you grow with the software as you use it in an increasingly more sovereign way. Not just pushing buttons on a GUI
My Recommendations:
- Raspiblitz: Lightning and more. Probably the cheapest. Terminal based Cypherpunk-style usage. Highly recommended for aspiring sovereign node runners. Great support from volunteers
- Nodl: Lightning and more. Sleek UI, performance hardware
- RoninDojo: No Lightning but strong privacy-focus. Best with the Samourai software stack
Note that most of the node projects can be ported to Ubuntu(and some other distros) by burning the appropriate OS image or running them in virtual machines. Look for guides if interested.
These solutions however can leave you with less maintained, less tested configurations and require more skill to set up and operate. The advantage is that you don’t have to buy additional hardware.
You should go for a dedicated hardware setup long-term and run things as they were meant to be run.
Is Lightning necessary?
Running your own bitcoin full node is a must for sovereignty. It is however a topic of contention whether running your own Lightning node is a good idea. It adds substantial complexity and management costs. It also comes with potential security gotchas putting your funds on Lightning channels at risk.
However it is very handy to run a sovereign Lightning node with some funds on Lightning when on-chain transaction fees are getting high. High fees are good for bitcoin base-layer security and it should be the long-term trend. At that point you’re going to pay a lot to open channels. The early bird catches the low-fee Lightning channels, they say. Start here.
That said, most people use Lightning with custodial wallets which is acceptable if you don’t put too much money on the line.
Option3: DIY hardware for the tinkerers
If you are a true tinkerer, I am sure you already thought of this option. With the hardest challenges you learn the most. But if you are not ready for this and push yourself too far at this point, you risk a burn-out(or your funds).
Know yourself, know your limits. You can start with option 1 or 2 then experiment with DIY hardware and switch as soon as you are confident enough. Having said that, all the above projects can be DIY-ed on many types of hardware. Choose your destiny and fall down the rabbit hole.
Raspberries are gonna be your most compatible choice if you want to try multiple software on a single dedicated hardware because it is kinda the cheapest and most popular so projects tend to port their software for at least that.
Raspiblitz is my favorite in this category. Check out the alternative platforms guide for hardware alternatives to Raspberry.
I will note again that using a Node implementation on the particular hardware that it was designed for is going to be an overall safer and better experience. That said, a raspberry operating system is very close to Debian Linux so any project designed for primarily for raspberries should work on Debian amd64 architecture.
Signet is boring! Get me the real deal!
Option 1: Go the OG way
Take notes in your KeePass database to save handy info you learn here!
This is going to be the most technical part of the whole chapter. Don’t worry though, every step is well-explained. For additional learning you can take your time and research each concept or command in the guide. Command manuals can be browsed using man <command> in the terminal.
If you get stuck at a certain step try to hit up the nostr community for help. Remember to beware shady direct messages.
OBJECTIVE(optional): Prepare the external 1TB SSD(Progress Images)
- Put the disk in the case and plug in your computer
- Launch
Disksprogram - Select your 1TB disk and go to Settings wheel –>
Format Partition - Name the disk and go for
Ext4file system - You can password protect the disk too. Make sure to read about
LUKS(Linux Unified Key Setup) before doing that because it has some implications you better know - Complete the process. You will see the name of the disk and
Ext4label appearing instead of the initialUnkown - The
Playbutton mounts the disk - becomes accessible to the user - The button can unmount if you want. You will use that from now on extensively with your node so don’t do it or stop your node before unmounting
- See the
Mounted atsection. Note the path or write it down. You will need that as the data directory for your node - You can close the
Disksprogram - You can check info about your storage devices in the terminal
lsblk- blk stands for “block device” which is how Linux calls hard disk storage where you read and write blocks of data
- You can think of
<a/b/c/d>as different storage devices - Storage devices connected through faster means with PCIe (not USB) are named
nvme: non-volatile memory express. If you connected your SSD this this way it will list it with the this label - The different partitions are segregated for different tasks in the OS. The list shows them in a tree-structure, stemming from the disk and partitions taking up a chunk of space from it
- Done
OBJECTIVE: Download bitcoin core and prepare for verification(Progress Images)
- Go to the bitcoin core webpage. Go to the “Download” section
- Download the latest version(24.0.1 at the time of writing) with the necessary files for verification:
-
“Download Bitcoin Core”button downloads the main archive file (for x86-64 architecture, Linux platform) -
SHA256 binary hashes: Contains the hash list of that bitcoin core release for the different platforms. This list must contain the unique hash identifier of the archive file you just downloaded -
SHA256 hash signatures: Contains the signatures of the bitcoin core developers who attested to this release by signing the“SHA256 binary hashes”file with their private keys.
-
- Import public keys of some bitcoin core developers of your choosing.
- You can go to the bitcoin core builder keys folder to get some public keys. Alternatively you can get public keys of notable developers basically any way you want/can (social media, in-person…)
- You can cross-check them from different sources. Nostr, twitter, keybase, github are places these people might hang around advertising their public key
- You see keys listed as
*.gpg. You want to download a few of them(at least 3) and also import them:curl \ https://raw.githubusercontent.com/bitcoin-core/guix.sigs/main/builder-keys/<developer name>.gpg | \ gpg --import- Substitute
<developer name>for their real name(e.g.Sjors) and run this command for all developer keys you want to download - Use the
uparrow to easily bring back the previous command and edit the names
- Substitute
- It might complain about this and that missing or not found but it should say imported
- You can go and learn more about gpg “Web of trust” and how to add trust to these keys when you cross check them
- You can cross-check by finding the people online but going to conferences and meetups is also a great way to connect and verify. It could be considered kind of a trophy
OBJECTIVE: Verify Bitcoin Core(Progress Images)
- Now you can really verify bitcoin core against these imported keys:
- Navigate to your Download folder where you have the
bitcoin-24.0.1-x86_64-linux-gnu.tar.gz(or similarly looking file but different realease version of bitcoin core),SHA256SUMSandSHA256SUMS.ascfile - Verify the signature hashes file against your imported public keys:
gpg --verify SHA256SUMS.asc - You should be able to find lines that say
Good Signature from <developer name you chose to import>. If you can’t find any then none of the developers you imported signed that release. This can be a warning sign of possible malicious software but since not every bitcoin core developer signs every release, it could be the case that there are other trustworthy developers who signed it. Import more signatures and retry - Now that we can trust the
SHA256SUMSfile, we can verify the downloaded bitcoin core linux archive file with it. That means if we create the hash of the downloadedbitcoin-24.0.1-x86_64-linux-gnu.tar.gzfile on our machine, it should be listed in the list of precalculated release hashes in theSHA256SUMSfile. We will ignore missing release files for different platforms:sha256sum --check SHA256SUMS --ignore-missing - Expected result:
bitcoin-24.0.1-x86_64-linux-gnu.tar.gz: OK
- Navigate to your Download folder where you have the
It was somewhat arduous to verify bitcoin core(especially if you cross-checked public keys from different sources. In this case, congratulations!). We should not take this process lightly because malware could indeed do us lots of harm. All your bitcoin transactions will be routed through your node so treat it with utmost respect.
OBJECTIVE: Install Bitcoin Core(Progress Images)
- Navigate to the Downloads folder
- Unpack the linux archive file:
tar -x -f bitcoin-24.0.1-x86_64-linux-gnu.tar.gz - Copy the bitcoin core binaries(executable program files) to a place where they belong(the directory where user-downloaded software usually goes) and set their privileges:
sudo install -m 0755 -o root -g root -t \ /usr/local/bin bitcoin-24.0.1/bin/- Note that we use the
installcommand to merely copy the binary files to the place they belong without using theaptpackage manager. Since bitcoin core is not a.debpackage we do things manually.
- Note that we use the
The binary files are already installed(copied) in place but you have to configure Bitcoin Core to your specific needs. Privacy is one of the important ones.
Let’s prepare to drive all traffic of Bitcoin Core through the Tor network for privacy gains.
OBJECTIVE: Setup a Tor proxy service(Progress Images)
- Check out this explainer youtube video about how Tor works and how Tor onion services work(clearnet links)
- Install tor package
- Open a terminal and run command
sudo apt install tor - This immediately starts tor daemon listening on port
9050for incoming traffic on localhost(your local machine, no external connections)
- Open a terminal and run command

OBJECTIVE: Configure and learn to manage Bitcoin Core(Progress Images)
- 💡 Learn about the components of Bitcoin Core
- Navigate to the directory where you will store the blockchain
- If you don’t use an external SSD it should be in the home folder
- If you have an external SSD just go to the root directory where it is mounted
lsblk
- Create a hidden data directory for bitcoin core
mkdir .bitcoincd .bitcoin - Create the configuration file in .bitcoin folder
nano bitcoin.conf - Edit
bitcoin.conflike this:#bitcoin core configuration file #These vaules can be overwritten by command line arguments ###### bitcoind options ######## #Accept command line and JSON-RPC(remote) commands server=1 #Run as a background process daemon=1 # Maintain a full transaction index #This is not an electrum or fulcrum indexer, it does not index addresses txindex=1 # Let bitcoin core set up its wallet. Sparrow will make use of this disablewallet=0 # Data directory. Blocks will also be stored here. USE YOUR OWN USERNAME! datadir=/media/five/five-disk/.bitcoin # If you have enough capacity in your home folder use that path # datadir=/home/<username>/.bitcoin ###### Connection settings ######## # User and password for authentication. Sensitive stuff!! rpcuser=five rpcpassword=myNodesControlPasswordThisGottaBeStrong! # Control port. Standard default rpcport=8332 #Commented out but can be used later #Allow other computers to control this node e.g. in a home network. #See CIDR notation on how to define ip_addresses: #rpcallowip=<ip_addresses> # Bind bitcoind to always listen on this address for commands. Only used with rpcallowip! #rpcbind=127.0.0.1:8332 <--- allow local access along with external access defined in allowip # Only connect to Peer Nodes through Tor onlynet=onion proxy=127.0.0.1:9050 bind=127.0.0.1 # Don't let bitcoin core get peers using clearnet dns servers dnsseed=0 dns=0 #### Optimizations #### # Don't let our mempool of unconfirmed transactions grow above 300MB maxmempool=300 maxconnections=40 - If you use an external SSD: bitcoind will look for the
.bitcoinfolder in your home folder by default but there is no such folder in your home directory, only in your SSD mount point. So in order to automatically redirect queries of that directory, create a magic portal to this directory, called a symbolic link orsymlink. Use your own username in the path:ln -s “/media/<username>/<path_to_folder>/.bitcoin” “/home/<username>/.bitcoin” - You can browse config options if you open another terminal tab and call the help command on bitcoind. You can search the output with the terminal search function
bitcoind -h- edit, save
ctrl + oand exitctrl + x
- edit, save
- If
bitcoindis shut down (due to some error or your computer gets shut down) your node is shut down. Although you might have to sometimes restart it manually when you modify settings inbitcoin.conf, let’s make sure it is run on startup:crontab -e- select
nanoas editor - Scroll to bottom and insert this line:
@reboot sleep 30 ; bitcoind- This line also lets your SSD be mounted by delaying the launch of bitcoind for 30 seconds after boot. There are other more sophisticated ways to do this with
systemdscheduler
- This line also lets your SSD be mounted by delaying the launch of bitcoind for 30 seconds after boot. There are other more sophisticated ways to do this with
- select
- Start bitcoind by just typing the command:
bitcoind - It should say
“Bitcoin Core starting” - To stop it, invoke the command
bitcoin-cli stop- Output:
“Bitcoin Core stopping”
- Output:
- If
bitcoindis running and you try to start it, an error message will say it is already running because you’re allowed to run only one mainnet instance of bitcoind on a machine - Check if
bitcoind(or other processes) is running with the“htop”programsudo apt install htophtop- F4 to filter:
“bitcoind” - Exit by pressing
“Esc”then“q”
- F4 to filter:
- As soon as
bitcoindis running, it immediately starts to download and verify all the blocks right from the genesis block. This is called“Initial Block Download”(IBD). This can take days in some cases throughTor. Be patient - Check network configurations
bitcoin-cli getnetworkinfo - You can check progress in the terminal running
bitcoin-cli getblockchaininfo- or check the number of downloaded and verified blocks with
bitcoin-cli getblockcount
- or check the number of downloaded and verified blocks with
- Furthermore, if you dump the “debug.log” file’s output in the terminal you can see everything bitcoind does in live action:
tail -f ~/.bitcoin/debug.log- Use
ctrl+cto stop and get back to the terminal
- Use
- There are many other handy commands. Read about the RPC api reference here or get some help in the terminal running:
-
bitcoin-cli -helpfor usage of the command itself, or -
bitcoin-cli help(without a dash) to show all the possible RPC options
-
- For example to list all the existing peers and check their nodes configurations
bitcoin-cli getpeerinfo- Notice the
.onionaddresses in the“addr”field
- Notice the
- Use the terminal’s search function on the output text if you’re looking for something specific.
- You created some directories and files and you might forget the path to them. Look into the
“find”and“locate”commands to easily find them in the terminal - Keep bitcoind running to complete the
IBDin the background
Your OG! Now your computer is running a verified, privacy-enhanced Bitcoin Full Node on Bitcoin mainnet!
However, let’s use Sparrow in testnet mode just a little more for a couple of interesting prep exercises before you get real bitcoin! In the meantime bitcoind will finish the block download and verification.
OBJECTIVE(optional): Upgrading bitcoin core in the future
- Since bitcoin core should be optional to upgrade(unless a hardfork happens in bitcoin which should be extremely rare) always carefully check the release notes and feel free to discuss the changes in related groups
- The upgrading process is almost exactly the same as the process described above except you don’t have to configure tor and bitcoind again
- Download the new version, verify, extract and install the new binaries
- Restart bitcoind and check new version:
-
bitcoin-cli stop -
bitcoind -
bitcoind --version
-