Quest 7: The Real Deal: Get some real NoKYC bitcoin
Table of contents
- OBJECTIVE: Prepare yourself to test P2P bitcoin exchanges(Progress Images)
- OBJECTIVE: Try HodlHodl on testnet(Progress Images)
- OBJECTIVE: Try Robosats on testnet(Progress Images)
- Buy NoKYC Bitcoin
- OBJECTIVE: Launch Sparrow in mainnet mode(Progress Images)
- OBJECTIVE: Connect Sparrow to Bitcoin Core(Progress Images)
- OBJECTIVE: Let’s get serious: Buy some NoKYC bitcoin
- Your LN options to try Robosats
- (OPTION 1) OBJECTIVE: Buy some real NoKYC sats with Robosats using Lightning
- AI and bitcoin self-custody
- OBJECTIVE: Start using ChatGPT from OpenAI to enhance your learning and computer skills
Most probably you don’t get your salary in bitcoin and Pleb mining is a great thing but if you haven’t gotten into that yet, chances are you are left with P2P trading platforms for regular NoKYC bitcoin purchases.
To get a taste of P2P freedom-exchanges, you can test things out on bitcoin testnet without any serious consequences. Sadly, only a few of them have testnet capability. At the time of writing, only HodlHodl and Robosats can be tried on testnet and not even the most modern testnet that is signet but the legacy testnet.
OBJECTIVE: Prepare yourself to test P2P bitcoin exchanges(Progress Images)
- 💡 Learn about the P2P market ecosystem and how to get NoKYC bitcoin
- Reboot Sparrow in legacy-testnet mode
- From menu:
Tools–>Restart in Testnet - From the command line. Close Sparrow then:
Sparrow -n testnet - Luckily legacy testnet has a built-in public server option. Connect to that in the server preferences. Sparrow server button should be yellow now
- Create 2 new testnet hot wallets. No encryption password necessary for these
- Get some testnet coins for one of the wallets from a testnet faucet
- You are ready to try out P2P trading on testnet
- From menu:
OBJECTIVE: Try HodlHodl on testnet(Progress Images)
- Go to HodlHodl testnet version
- Create 2 testnet accounts. You will need 2 test email addresses
- For privacy:
- You can use duck email protection for free
- Protonmail aliases if you pay for a mail plus subscription
- Or these two combined
- Or just use separate email addresses
- Generate and Save your passwords in your Keepass of course(or cloud based password manager since this testnet accounts are not that crucial)
- Confirm accounts and log in both of them with different browser sessions(incognito tab or different browsers)
- Either now or later at the trade you will be asked to create an extra
“Trade password”in theAccount settings. Save those too they are important
- For privacy:
- Copy an unused address in your testnet wallets and save them in your HodlHodl accounts. This is used as the btc buyer’s
Release addresswhere funds arrive after he paid for the sats in fiat- Click on your username in HodlHodl and select
Dashboard - Go to Settings and paste the address there from Sparrow
- Always use a different unused release address for every trade
- Click on your username in HodlHodl and select
- Create an offer to SELL bitcoin with one of the accounts. This is your maker account for this trade
- Click on
“Sell BTC”in the top bar - Click the
“Create offer”button - You can arrive at the same result if you go from
“My offers”in the top bar - Look at all the settings and you start to get the gist
- Select
“Add margin” - Enter a premium
- Change from
“Fixed amount”to“Amount range”for the offer. Don’t go over your sender wallets limit because you won’t be able to sell the sats you don’t have ;) - Go to
“Create new payment instruction” - Choose any payment method. It doesn’t matter since there will be no real fiat payment
- Use 24 hours access option and add an
Offer Descriptionif you want - See how the trade process goes at the bottom of the page
- Click
“Create offer to sell BTC”(hopefully last time you do this ;)
- Click on
- Go to the other account and take the offer
- Select
“Buy BTC”option in the top bar - Set the same fiat currency as your created offer. Leave the other options on
“All…”to show every offer - Find your offer. There are not many on testnet. The
“Offer Description”column will help too if you added one - Click on the offer and it shows the details. Enter an amount in the range. Look at how the fees and other trade data changes
- Double-check the
bitcoin receive address - Accept the offer
- Look at the page and browse all the info. Then click on
“Generate escrow” - Enter payment password
- Select
- Go to the maker account in the other browser and carry on with the trade
- Go to
“My Contracts”and click on the pending contract - Click on
“Generate escrow”and enter password - HodlHodl will give the escrow address for you to deposit the sats to be sold. Read the description text carefully
- Copy the address given, Go to the sender wallet in
Sparrowand Send the amount - Confirm on HodlHodl that you indeed sent the funds in escrow. The transaction is unconfirmed yet.
- Go to
- Wait for the escrow transaction to confirm. Go back to the bitcoin buyer/taker account and see the information is changed. It warns that you should not send the fiat payment until the seller funds are not locked in
- Legacy testnet block confirmation times can vary
- Test the trader chat in the meantime
- Once it has reached the necessary amount of confirmations(mostly it is 1), the bitcoin buyer has to “send” the fiat payment. This of course won’t happen so just push
“I’ve sent the payment” - On the btc seller side you can now either accept that the fiat transaction is complete by pressing
“Release deposit”or“Start a dispute”if the fiat payment has not arrived contrary to what your trading partner claims. Release the deposit by entering the payment password - You can rate your trading partner after a trade
Congrats! You just made a test trade and learned a lot about P2P exchanges! Time to test another exciting platform!
Warning: This exercise has not been thoroughly tested to work 100% because it builds on tools that are not always reliable.
OBJECTIVE: Try Robosats on testnet(Progress Images)
- First you need a testnet Lightning wallet
- Go to this custodial testnet Lightning site
- It can be buggy sometimes. Just refresh page or try a different browser session
- Follow instructions and save secret
- You get some initial Lightning tBTC
- You can fund a Phoenix testnet Lightning wallet as an alternative
- Open a Tor Browser and go to https://robosats.com
- Go to the dotted menu
“…”(more) in the bottom bar and the hat icon will take you to https://learn.robosats.com - Select
“Quick start”and browse the topics and links - Go to
“Access Robosats” - Scroll down to Testnet and go to the onion address site
- The unsafe clearnet site is more stable
- Go to the dotted menu
- Note: This exercise works with one Tor browser but it can be buggy sometimes. It is easier to do it different Tor browsers but Tor does not allow multiple browser instances to be opened. So either use another computer/android mobile phone with a Tor browser OR Use clearnet Robosats with the other trading party
- Generate your one-time Robot(maker) for the trade
- Click
"Generate Robot"and save the token then continue - Backup the robot token always when you create one. It is just for one trade, can be in a simple offline text file
- Click
“Create”and this time choose the btc buyer role for the maker - Enable advanced settings in the the top-right corner to see some more details
- Decide on amount range, dummy payment method and premium
- Robosats uses fidelity bonds as a pre-commitment mechanism to incentivize honesty in trades. This is determined as a percentage of the value of the trade in sats. You can set it to any percentage and Robosats will ask you to lock in that amount before the trade. The more you set it the more “fidelity” is assumed by traders. If you cheat or don’t follow up on the trade, your bond is not returned to you
- Click
“Create order”. You are presented a Lightning hold invoice as the maker bond- Pay it in time, it gives you like 10 minutes
- Copy it and go to htlc.me. Go to
“Send”and paste the Lightning invoice then hit enter to pay- Or you can go to Phoenix on your mobile, scan the invoice and pay it
- Lightning wallets might complain that the payment was unsuccessful but the hold invoice still gets paid this way
- It should make the payment. If no route was found, just refresh page or go to another browser and try again
- Once it is paid your offer is public
- Click
- Generate the
Taker Robotand take the order. You can do this from an android phone, or another machine or the same machine as a last resort do this:- Open another tab in Tor browser and navigate to testnet Robosats again
- You can add another Robot in the same
“Robot garage”on the Robot tab
- Go to the
Offerstab and find your offer. If you created a buy offer then go to sell or the other way round. Make sure the currency matches - Click on the offer and see details. Enter minimum amount and take order
- Pay the taker bond from
htlc.meor Phoenix wallet- Don’t run out of time
- Now you have to deposit the sats that you want to sell as the taker. Pay the invoice with
htlc.me - Now the buyer needs a way to receive the locked sats from the seller. Go back to the maker(buyer) Robot on the Robot tab selecting it from the dropdown menu or from the other tab.
- Submit a Lightning invoice with the exact amount of sats with
htlc.meorPhoenixOR you can receive the satson-chainfor an extra fee. Let’s select onchain for this example - Generate a fresh address in the receiver wallet in
Sparrow, add a label like“from Robosats trade”and paste it in the Bitcoin address field. See that it is a high on-chain swap fee of 1-2%. ClickSubmit. - Now the two Robots can chat about the payment details. There is no preset fiat payment account to receive to. You can push the the tiny concentric circle button in the trader chat if
Torconnection is slow - With the order maker(btc buyer) robot click confirm fiat money sent to btc seller
- On the taker side confirm fiat money received
- Your trade is complete. See the released bonds are returned and the escrowed sats from the btc seller shortly are released on the wallet address in
Sparrow - You see now that
Robosatsis effectively releasing the funds to the btc buyer which means it Robosats could rug you theoretically. However this would harm its reputation so perhaps it is does not serve its interests to steal from a few people then go bankrupt - However the maximum amount you can buy on
Robosatsat the moment is 5 million sats. E.g.Hodlhodluses an escrow mechanism that is released by the platform and the btc seller together - In
Robosatsalways look for notifications because once the bonds are locked in, you can lose it if you don’t carry on with the next step on your side of the trade. You have multiple hours to do that but nonetheless people tend to forget about things - If your partner abandoned your locked-in trade,
Robosatsand you share 50-50% if the fidelity bond that was locked by the abandoned party
Now you can see two different P2P exchange approaches. Neither is better, they are different. The Lightning-based Robosats can be simpler, faster and more private with the Tor browser-based approach but Lightning could arguably not cater to high-value trades because of the Lightning network still having some serious payment routing problems to overcome not to mention failures from DDoS attacks on Tor browser. Another notable feature of Robosats that we haven’t tried is the "on-chain/LN swap" service. It can come handy for LN node runners. Feel free to look further into this.
HodlHodl seems like a polished platform while Robosats is considered experimental despite a large number of successful trades completed. Onchain transactions will always be more trusted than Lightning but they will get increasingly unaffordable for most people with little amounts.
Fantastic! You have all it takes to really get your feet wet:
- You know how to download, verify, install and upgrade open-source software
- You know the basics of the bitcoin UTXO model
- You know how to manage bitcoin wallets and backups
- You know how to use a bip39 passphrase
- You know how to use a hardware wallet
- You learned the basics of Sparrow wallet
- You know how to order bitcoin related stuff online in a safe way
- You have a grasp on entropy and its implications on encryption
- You know how to store bitcoin-related passwords and metadata securely
- You understand the importance of open-source software
- You have a safe way to practice and test your ideas on signet and testnet
- You learned the basics of Linux, the go-to OS in bitcoin and open-source software
-
You know the basics of bitcoin privacy
- You understand the threat of KYC and chain surveillance
- You understand the importance of NoKYC bitcoin
- You are running your own sovereign full node on Tor
- You have a basic understanding of UTXO management
- You have a firm grasp on P2P markets and how to get NoKYC bitcoin
Buy NoKYC Bitcoin
Let’s get to serious business. This is not just pushing some buttons here and there leaking your PID all over the place. This is serious stuff. This is where it can get murky.
Please do not proceed with the real-money exercises if you don’t want to deal with some potentially bad consequences described above. This is in no way financial or legal or any kind of professional advice. This is a pleb talking to you about the reality of plebs.
Sparrow wallet has been connecting to the Bitcoin Plebs Signet node. To launch Sparrow in mainnet mode automatically, you need to make some adjustments in your system configuration
Warning: Don’t ever use the same seed words for your testnet wallets as your mainnet ones. Generate fresh wallets.
OBJECTIVE: Launch Sparrow in mainnet mode(Progress Images)
- Edit the
“.profile”filenano ~/.profile - Delete or comment out the line that you put there previously or edit to
“mainnet”instead of“signet”#export SPARROW_NETWORK=”signet”- You can switch it back by uncommenting this line whenever you feel like experimenting
- Or you can start Sparrow with a network option like
“Sparrow -n signet”or“Sparrow -n testnet”to run single experiments. Since it is onPATHyou can do it from anywhere in the command line
- Reboot the computer to take effect
OBJECTIVE: Connect Sparrow to Bitcoin Core(Progress Images)
- Check with
htopthat your node restarted after reboot - Open
Sparrowin mainnet mode - Go to
File–>Preferences–>Server - (If you already have a connection then press
“Edit Existing Connection”. Server Configuration settings become editable) - Select
Bitcoin Corefrom the server options - In the
Bitcoin Core RPCsection you see some settings- In the
URLfield type in your localhost IP address where your node is running:127.0.0.1 - In the port field put in
8332(default rpc port on mainnet) - For
Authentication, select theUser/Passoption and enter therpcuserandrpcpasswordfrom your“bitcoin.conf”file - Enable your external tor proxy by switching on the
“Use Proxy”switch and entering the proxy settings:127.0.0.1:9050 - Now Sparrow will handle all external(not node-specific) communications through tor
- Fetching data for fee estimation
- Fetching bitcoin/fiat exchange rates
- Communication with the Coinjoin coordinator server
- In the
- Note that this configuration only allows you to connect to your node with Sparrow on your current machine through
localhost- See the
rpcallowipinbitcoin.confto allow external connections
- See the
- Press
“Test Connection”- If the
IBDhas not finished yet, this message will appear: “The connection to the Bitcoin Core node was successful, but it is still syncing and cannot be used yet.” - Once it is finished though you should see a green check mark appearing on the
“Test Connection”button and some server message saying“...Connected….”
- If the
- Press close on that window and you should see that in the bottom right corner the
“Server Switch”is now switched on and it turned green- If you hover over it it should say that it is connected and the info about the connection
- To the left of it you see the Tor sign appearing. Hover over it and it should say something like
“External Tor proxy enabled”
- Create your first mainnet airgapped wallet. You will use it soon enough! Consider backing it up in steel!
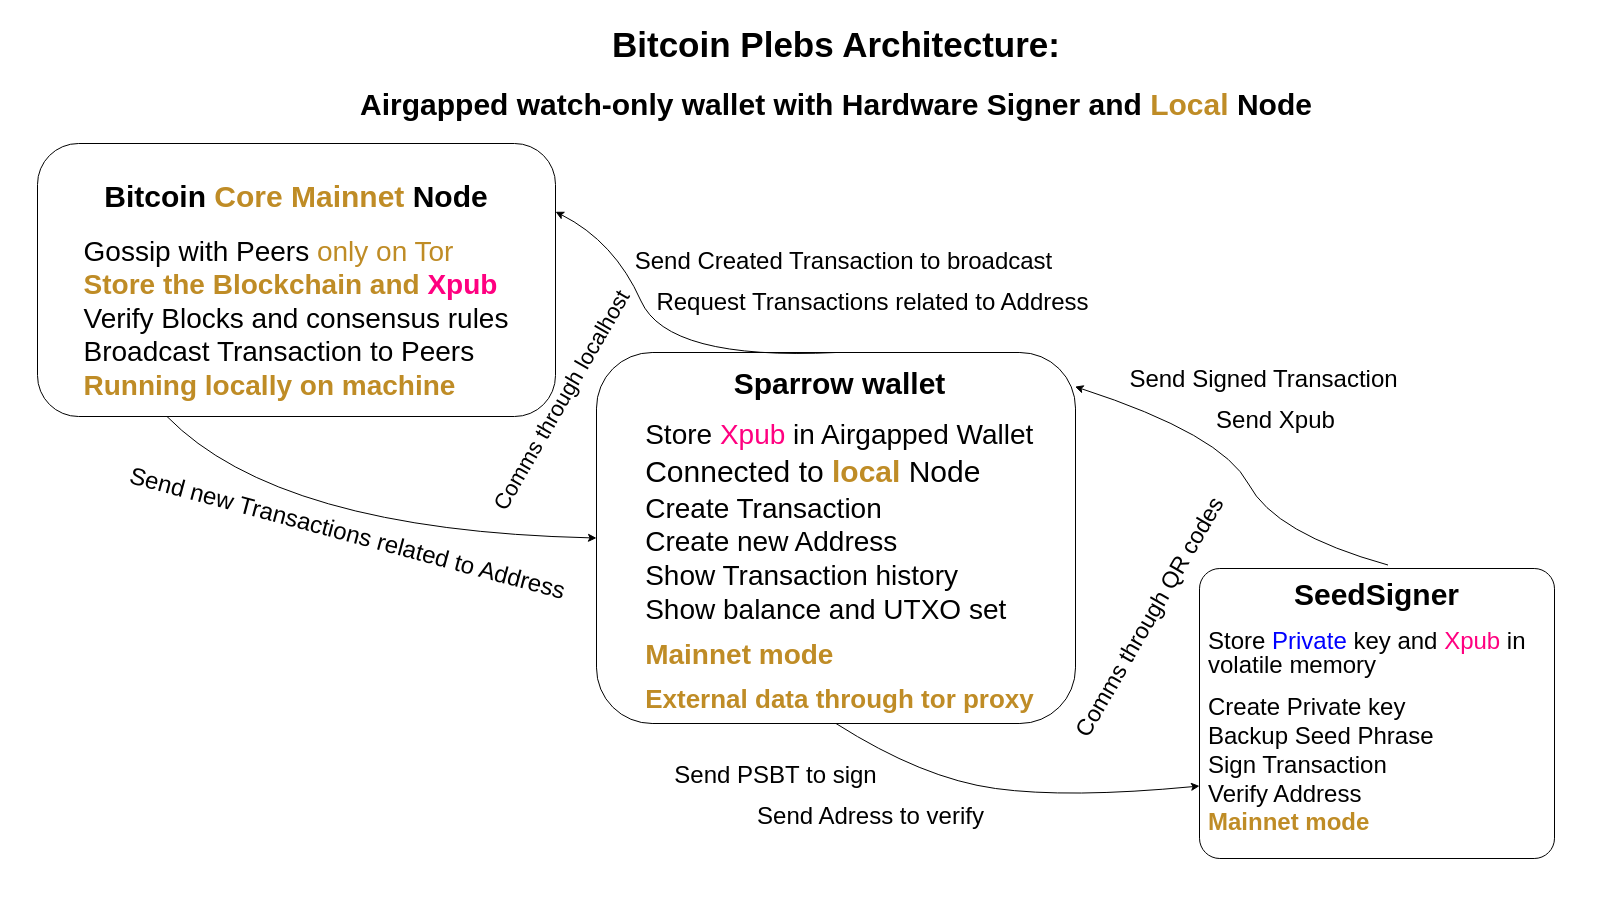
- Take a quick look at the result architecture again(click to enlarge):
Note that this guide is a fairly minimalistic approach in order to jumpstart your bitcoin node journey. Feel free to look for additional features, optimizations and security hardening measures in the Bitcoin Plebs community or other node-related communities, like the Raspibolt or Raspiblitz community to improve your node experience and level up your nodes capabilities:
- You can use more advanced node configuration options
- You can set up your own private electrum(electrs/fulcrum) server. This will speed up wallet loading in Sparrow, improves privacy and unlocks extra services that rely on an electrum server implementation
- You can set up a safe remote connection to your node
- You can add Lightning capabilities to your node. This comes with substantially more maintenance though
- … and many more!
The following is NO professional advice! Author cannot be held liable for any harm, damage or losses you incur by applying the following practices!
OBJECTIVE: Let’s get serious: Buy some NoKYC bitcoin
- Make sure you have an
airgapped mainnet walletwith a securepassphrasein place -
Steel backupif you have one - Sparrow switched to
mainnetmode - Seedsigner switched to
mainnetmode,Persistent settingsset toDisabled- If you reboot SeedSigner it would switch back to testnet if you forgot to disable persistent settings. This could cause confusion when trying to sign mainnet transactions. Always check these settings carefully and sanity check what you are doing: e.g. testnet addresses usually begin with
tb1while mainnet native segqit withbc1
- If you reboot SeedSigner it would switch back to testnet if you forgot to disable persistent settings. This could cause confusion when trying to sign mainnet transactions. Always check these settings carefully and sanity check what you are doing: e.g. testnet addresses usually begin with
- Buy some NoKYC bitoin on
HodlHodl- You can watch this video about HodlHodl from the one and only BTC Sessions as extra preparation
- Buy some NoKYC bitcoin on
Peach- You can coinjoin funds after each buy if you know how to do it(not part of this program). It will be more private
- Use the sats you bought to buy some more NoKYC bitcoin on
Bisq- You can watch this video about Bisq from BTC Sessions
- Never deposit KYC bitcoin into a bisq trade because the UTXO gets mixed up with the NoKYC UTXO that your partner will sell you!
- Always coinjoin KYC coins before doing anything with them and NEVER keep unmixed KYC UTXOs with NoKYC UTXOs in the same wallet!(Remember, Segregation)
- The NoKYC sats bought on P2P marketplaces is already quite private but you can coinjoin the sats you just bought of course to sever the identity link from your peers as well
- You should send bitcoin you bought to your prepared cold wallet. Some platforms already asked you to provide an address to send the sats to but e.g. bisq deposits the bitcoin you bought in its own hot wallet so it will warn you that although you custody the bitcoin already, you should withdraw it to a safer cold wallet
- Understand your trade on the blockchain: track every step of the trades you just made on
mempool.spaceinTor browser. Helps to really understand what just happened
OPTIONAL: In order to try Robosats, a bitcoin wallet is required that is NoKYC and has Lightning capabilities. Lightning is not a focus of this training program so feel free to skip this part if you want to learn more and start your Lightning journey with a sovereign node setup.
Lightning is great because although bitcoin’s primary strength is being a store of value, it is great to showcase what it can do as a medium of exchange as well. However, Lightning is still in its infancy and there are all kinds of risks involved. Hot wallet risk, channel backups, mandatory security upgrades from time to time… it is mainly for experimentation with small amounts.
That said, transacting on Lightning can be really cheap, fast and the settlement is instant. You can do many things with it that showcases the benefits of programmable money like zapping on nostr, streaming sats for your favorite value for value podcast or just generally pay/receive sats privately and in a cheaper way than a base-layer transaction.
If the transaction fees rise (which is supposed to be a good thing that improves the security of bitcoin) Lightning will be essential to small bitcoin payments. I reckon you will be using Lightning in the not-so-distant-future anyway.
Your LN options to try Robosats
- Get a decent custodial but NoKYC Lightning wallet and load it up with a little amount of sats
- Get a decent non-custodial Lightning mobile wallet like Phoenix or Breez
- Upgrade to a LN full node and use Lighting in a non-custodial sovereign way. You can upgrade your current machine or buy a dedicated Nodl or a Raspiblitz node
- Once you have your own Lightning node up and running, you can try funding its on-chain wallet, open channels and make some payments
- It can also be used in testnet mode(might be a good substitute for htlc.me)
- Use Zeus wallet to control your LN node from mobile
- Skip this part and come back later
(OPTION 1) OBJECTIVE: Buy some real NoKYC sats with Robosats using Lightning
- 💡 Learn about Lightning wallets from this comparison article
- You can watch this tutorial video about Robosats from BTC Sessions
- Probably your best choice would be to use something that Robosats lists as fully compatible AND is desktop compatible as well. If you go custodial, Alby is a decent choice in my case. It goes very well with using nostr on desktop too
- On mobile the choice is not so obvious because of all sorts of potential compatibility issues
- Install the
Alby extensionon a compatible browser according to instructions if you haven’t already - Create an account with a private email address(no gmail)
- Fund the wallet with some sats. Be aware that if you are to be the taker on
Robosats, the minimum offers tend to be around 100 EUR/USD and you need to send the taker bond of several percent of the value in sats before trading - Open
Robosatsin aTorbrowser, create and backup the robot - Make or take an offer to buy sats
- Beware to choose offers with compatible fiat payment methods
- Don’t let the timer expire because you will lose your bond
AI and bitcoin self-custody
There are very helpful communities dedicated to bitcoin and open-source software. These come handy when you cannot deal with a technical hurdle, would like to discuss an interesting topic or share your knowledge and experience on something. I can see however that depending on the group, somewhere around 75% of people ask the same trivial questions for which the answer can be easily found on the internet.
This is sad because the time of the volunteer supporters of bitcoin and FOSS projects is quite precious. We should respect each other’s time or a culture is going to develop where people more in the know will get frustrated and eventually burned out resulting in hostile behavior towards newbies.
It is getting increasingly easier to find a solution or at least a starting point when dealing with technical issues without the need of human interaction. Moreover, when you have a relatively unbiased opinion about how something should be done then you can use that to verify what someone has told you. You still have to master the basics to be able to make an educated decision but if you use ever smarter tools to assist you with your decisions, you can get vastly improved results.
Getting to the point, Google and other search engines are great but AI will be the next step in the evolution of learning and searching for information. The amount of time, money and headache that you can save by using AI will pay off handsomely, not to mention there are free options to choose from.
For now the most usable and accessible AI I can recommend to use as your technical enhancement or aid in self-custody is ChatGPT by OpenAI.
OBJECTIVE: Start using ChatGPT from OpenAI to enhance your learning and computer skills
- Create an account on OpenAI(clearnet link!). Make sure to do this with privacy in mind:
- Use a VPN service on the machine where you intend to create the account or use the service
- Use a dedicated privacy-preserving email address like Protonmail
- At the time being there is sms-based phone verification involved in the account creation process. Circumvent it with services like textverified, silent.link, sms4sats or lnvpn. Make sure to pay for these services with bitcoin(where there is option to pay with fiat) with a privacy enhanced transaction
- For now there is a free plan that you can use when server traffic load is low
- Do not doxx yourself or any delicate information that is tightly related to your bitcoin setup while using the service
- It will be most useful with well-established areas of knowledge like Linux. Try to ask something from the AI like “Tell me how to use Ubuntu in a secure and private way”
- You can now verify anything in this program more easily, improve on your present setup and gain more knowledge. Don’t trust, verify.
Congratulations!
You completed all the challenges so far on your path to become a Bitcoin Pleb! Now that you have mastered all these tools it is time to graduate!